Friday, March 30, 2012

Soft Sugar Cookies

Pintrest Objective: http://pinterest.com/pin/195765915022335564/
 Original source: sweetpeaskitchen.com


For the Cookies:


  • 6 cups flour, divided
  • 1 teaspoon baking soda
  • 1 teaspoon baking powder
  • 1 cup butter, at room temperature
  • 2 cups granulated sugar
  • 3 eggs
  • 1 teaspoon vanilla extract
  • 1 1/2 cups light sour cream
For the Frosting:
  • 1 cup butter, at room temperature
  • 1 teaspoon vanilla extract
  • 4 cups powdered sugar
  • 6 tablespoons heavy cream
  • Several drops food coloring
  • Sprinkles
Directions:
  1. In a medium bowl combine flour, baking soda, and baking powder; set aside.
  2. In my mixer I creamed the butter and granulated sugar at medium speed until light and fluffy, Add the eggs, one at a time beating until each is incorporated. Add the vanilla and sour cream and beat at low speed until combined.
  3. Add the dry ingredients and beat at low speed until just combined, about 30 seconds, scraping down the bowl as needed. Add flour as needed (you're going to need it to be a good consistansy to roll and cut!
  4. Divide dough into two sections. Flatten into rectangles about 1 1/2 inches thick, then wrap with plastic wrap. Chill in the refrigerator overnight.


At this rate its a two day cookie- they better be delicious!!

Mach 31st 2012
  1. Preheat the oven to 425 degrees
  2.  roll the dough out to 1/4-inch thickness. cut out and place on parchment lined cookie sheet
  3.  
  4.  Bake for 7-8 minutes, until pale golden. 
  5. Immediately transfer cookies to a wire rack to cool.
  6. Make frosting and dye appropriate color of your choice
  7.  


Now I heard to let them set before icing them and the longer they sit the better they taste (all the while I'm going: it's a cookie.... I'm gonna want to eat that cookie.) Well, I tried one out of the oven and it didn't taste too good and I was a little worried. I came back to it a couple hours later and sure enough they tasted better. The icing is almost a perfect match to the store and I think if my oven had cooperated better (even my inside thermometer said a different temp. than the outside one) They wouldn't have been as hard. Either way they don't crumble like store ones which is kinda what I'm lookin' for. All in all, they were still good.

Write on!

Pintrest Objective: http://pinterest.com/pin/195765915022173427/
Originally blogged: creativeconnectionsforkids.com

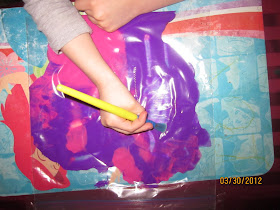
Hailey will be entering Kindergarten at the end of summer and lacks the fine motor skills needed for learning her letters. Quite frankly she was born lazy...that sounds mean...let me start over: Hailey is a pretty pretty princess who gets everyone to do everything for her. Except me. I'm kinda mean (but hey that's my job. If people find out I'm nice it's nothing but work, work, work, after that ;) <--for all the Princess Bride fans out there). Anyway The real reality of it is that Hailey hates to do anything when told to. I saw this pin and hoped it would encourage her to write her letters so that she doesn't seem so behind when she starts kindergarten.

You'll need:
 a zip loc bag ( I used a gallon size so she could write bigger and also words)
paint
duck tape
paintbrush

Empty paint into the zip loc bag. VERY carefully get the air out of the bag and seal. Next take a piece of duck tape and cover the top of the zip loc. Now your child can write their A B C's with their fingers or a paint brush (like a pencil, but won't puncture the zip loc)


verdict?: Hailey is very excited over using this- although I think she just likes the color.

Thursday, March 29, 2012

Bunny craft

Pintrest Objective :http://pinterest.com/pin/195765915022397251/

Originally blogged: alittledelightful.blogspot.com.au


What you'll need:
Paper plate
pom poms
pipe cleaners
crayons
pink paper (for inside of the ears)
 white paper (also for ears)
glue
scissors
Sharpie (or just black crayon)
So  with Eater a week away I've decided to make these cute little bunnies with my daughters feet. Because one day they will be teenagers and not want to look me in the eye. I don't have paper plates (if you didn't guess from the duck pond blog) So I'm making do with white paper cut out by tracing a dinner plate. HERE IS WHAT YOU DO: Trace your childs foot with the pink paper, cut it out and glue it to the white paper and then glue to the plate. While that is drying make the eyes (two ovals) and glue to the plate. Next take the pip cleaners and add to the middle of the plate to be whiskers and add pom pom as the nose. With a black sharpie add mouth. Yeah... I didn't have any of that. Well, okay I did but it is still packed and I'm too lazy to write on all the boxes clearly and I don't know where they are. So I made everything out of paper.

Wednesday, March 28, 2012

Minnie Mouse Ears for American Girl Doll

Pintrest Objective:  http://pinterest.com/pin/195765915022431089/

Originally blogged: katiejdesigns.wordpress.com


Once again I found myself wanting to make something I did not have these exact pieces. So I had to alter this pattern to make it work with what I've got! I made a pair of Minnie ears for Hailey when she was a newborn, this was pretty much the same thing. I'm sad I didn't come up with it first!

What you'll need:
Black felt:
2 strips of black measuring: 10″ x  .75″ (note it does not go all the way around the head- that's 12")
4 circles measuring 2.75" around ( I had to use a Rockstar can to trace that! haha) cut off one end to make a flat bottom
elastic (11 1/2")
ribbon
glue gun
batting

Directions:

Find the center of your headband and mark it with a pin. Then make two slits in the band and set aside.

Sew the "ear" pieces together and turn right side out, stuffing it with batting along the way. If you want a "flatter" ear look I suggest going to the original bloggers page and following her directions. You'll need stiff black felt instead. Push the flat part of the ears into the slits of the headband and sew on.

Next you'll need to add the elastic- to save time threading it through the band, I "sandwhiched" it in between my bottom band piece and top band piece and sewed it together (see pictures to understand)


Next measure on your dolls head and sew together elastic pieces making sure it's a snug fit. Please not the felt pieces are not long enough to cover all the elastic...or at least mine were not.
Now you need to get your ribbon out and make a  simple hair bow.
Hot glue it onto the headband and you have Minnie ears! Hannah loves yellow, so naturally we chose yellow! ;)

 ***If you found this helpful, funny or anything else. Please follow me! I get kinda lonely :( ****

Tuesday, March 27, 2012

Duck in a pond

Pintrest  Objective http://pinterest.com/pin/195765915022429105/
Originally blogged www.nwf.org

I'm on a duck kick right now. Quite frankly is probably has something to do with Hailey's preschool getting ready to perform a duck play for us on Thursday. I saw this on pintrest and thought it was adorable and perfect for her class...but of course I had to test it out :)


You'll need :
* The original pattern. For Hailey's class I re-scanned the picture in and photo cropped more to the page to be eco-friendly. I also printed it on yellow paper to save time for the preschoolers
*Paper plate
*scissors
*crayons (if you're printing on white) You'll at least need blue to color your pond.
*popsicle sticks
*paper plate 

Directions:
Print the duck and color him. Cut out and glue to popsicle stick. Color the plate blue for the pond (Now I didn't have a paper plate- go figure. So I had to use paper and then a blue piece of paper as the middle. You could call this "cheating" however I figure I have to alter the original pic anyway so people don't come after me for "stealing" )you could also color the rim green to be the grass around the pond). An adult should cut a slit in the center of the plate, once your duck is safely glued on you can  slip him into his little pond :)

Monday, March 26, 2012

Duckling Crafts

Pintrest Objective: http://pinterest.com/pin/195765915022431035/
Originally blogger: akindergardeninbloom.blogspot.com


What you'll need:
Yellow paint,
White paper
crayons

Today it's two crafts devoted to ducks. Because  my daughters and I love ducks :)  Paint your childs whole hand and stamp it sideways onto the piece of paper. Using their fingers (one vertical and one horizontal) make ducklings. Let it dry for an hour or so and let the kids add grass or water, eyes and a beak. Don't forget to add their ages and the year! It'll be amazing to see how much time flies.


***If you found this helpful, funny or anything else. Please follow me! I get kinda lonely :( ****

Sunday, March 25, 2012

Sugar Eggs

Pintrest Objective http://pinterest.com/pin/195765915022399041/

Originally blogged: http://scribbit.blogspot.com/2007/03/sugar-easter-eggs.html?m=1

Sugar Eggs are something I remember doing when I was a little girl.  My husband thought they looked like fun, so this weekend we were at Grandmas- a perfect kitchen to make a mess in. And it was just like I remember doing: my mom gets frustrated and tries to do the whole thing on her own terms telling me google is wrong....then was pissed that it was really her that was wrong. This was a two day pin, because it takes two days to make.

What you'll need:

For the egg:
3 1/2 cups sugar
1/2 cup powder sugar
1 egg white
Plastic egg molds

Royal icing:
8 cups of powder sugar
1 teaspoon cream of tar tar
5 egg whites, room temperature
gel food coloring
tips (star- 21)

Decorations:
Coconut
Easter candies (we found chicks and eggs and bunnies at the dollar store)

Directions:
 March 24th 2012

Combine all ingredients for the sugar egg- the mixture should feel like sand- it should NOT be too wet. Pack the egg molds  really tight- you do not want air and cracks. Level off the top. Invert the molds onto a tray and let them set in the mold. Release the sugar eggs and immediately cut an end off (this will be the part you "view" from) Set for about 30 minutes (touch- if they are too soft do NOT attempt to hallow.) let them set longer until the shell is kinda hard.

Hallow out the middle of the eggs using a spoon. Let rest over night.

March 25th 2012

Mix the royal icing together and add decorations. We dyed coconut green for grass, found erasers-yeah that was funny, and candy eggs and chicks.


After you're finished used some white royal icing to seal it closed. Add fancy decorations to the outside.


If you found this fun or helpful, please follow me. It gets a little lonely over here thinking that I'm talking to myself.


Friday, March 23, 2012

Mini Princess cakes

Pintrest Objective: http://pinterest.com/pin/195765915022417499/


My sisters baby shower is tomorrow...and well, if you haven't read how hectic that cake has been on me, you might. Looking back just from an hour ago it's something I can already laugh about. Anyway I was telling Hailey that if we didn't get the belly of the cake to work we would simply turn the "boobs" into dress skirts for her mini princesses. Well to her dismay the belly worked. I felt bad, but I had already used all my eggs with this cake. So I made a Vegan chocolate cake mix to fill the Wilton pan mold up again to make my two girls and niece a special cake for the baby shower.

My daughters have a TON of those princesses from target (the little ones that come with plastic dresses that always rip when they try to take them off? yeah those one. So I put them into the dishwasher while the batter cooked. There was NO way I was buying new ones. I let my sister know ahead of time to clean my nieces.

Make butter cream, dye the colors of your princess. I iced the main dress part of the cakes before putting the dolls in... I pushed her in a little farther than that after I took the picture.   Then I snipped a corner of a zip loc and covered the holes from where the body was pushed in (look by Snow Whites waist) then I added the chest colors. I'm a bit of a perfectionist for detail of colors (as much as I can get)


Snow White: Yellow, blue and light blue


Ariel- The first dress she wears as a human in Prince Erics castle.
White and pink


Belle: Yellow and bright yellow


Cinderella: blue and light blue


If you found this fun or helpful, please follow me. It gets a little lonely over here thinking that I'm talking to myself.


Pregnant Belly cake

Pintrest Objective: http://pinterest.com/pin/195765915022413553/

 
This post will make me look like a maniac- and honestly after just finishing the BAKING part of this cake I need a beer at 11:44am....it's 5 somewhere, right? lol

So my sister is due in April with another little girl. I always saw the pregnant belly cakes and thought they were funny. This time especially because she is having a C-section and it's making me giggle...don't ask why. Well I have gone through pintrest and pinned several cakes that I thought my sister would like. All of which do not have HOW to make them! argh!!!! So As of 9am I started this cake. I'm praying it works!

After Facebook-ing both Wilton (who never response) and Betty Crocker I was able to get an idea of how to make this. Betty says "Heat oven to 325°F. Spray 2 1/2-quart ovenproof bowl with baking spray with flour. In large bowl, make 1 box of cake batter as directed on box. Pour batter into ovenproof bowl. Bake 1 hour 15 minutes to 1 hour 20 minutes or until toothpick inserted comes out clean. Cool 15 minutes. Run knife just around top edge of cake. Remove cake from bowl; place rounded side up on cooling rack."


What you'll need:
Cake mix
fondant- I have seen belly cakes without fondant, but I don't think they look as clean.
butter cream
food coloring gels
fondant cutters
I also bought a nifty little pan from Wilton cake pan that looks like four domes (also look like boobs) I'm hoping it works because the stand house pan I bought from them does not.
Pyrex glass bowl- Pyrex is known for being able to bake in. I hope this is true! If you don't have one of those- Wilton also makes the basketball cake pan.

Directions:

 So I remember googling "baking cake in Pyrex bowl" and came across the doll dress  here (which essentially will be my belly for the cake) It said 350 but Wilton said I messed up on their house cake because the oven was up too high and there was more batter in the pan than you usually do so you should bake it at a lower temperature. Sooo Betty said 325 degrees- I went with Betty. 40 minutes to go and the cake was browning around the edges and raw in the middle...I was on the phone with my mom who has baking experience and well... lets just say I have already taken my built up anger and pms emotions out on the first belly..it's now in the garbage.


Boobs/Chest
I have a Wilton cake pan (can be used to make small princess skirts, etc...) I lowered the temperature from the belly to about 310 (because now thinking about it my oven really is evil and does bake things too hot).

After about 20 minutes I looked in the oven and held my breath- it was working. I checked the toothpick-clean.

It's now set out for a couple minutes and the puffy top is now deflated and the tooth pick is not coming out clean- wth? I'm starting to re-think this whole thing and am glad my mom is getting a spare.


I calmed down and before pulling another Jason Vororhees on the boobs I popped them back into the oven and just kept an evil eye on them. They are finally done and cooling on a rack- if this stomach doesn't turn out I'm simply turning them into something else I saw on pintrest.

Belly:
 I also tried my hand at another belly cake and again with 30 minutes to spare its browning in some weird spots. I simply got out the tin foil and wrapped it around the rims and am praying like hell this is going to work. I'm doing it at 310 degrees and it's been over an hour. I honestly just kept a watchful eye on it. I let it set for 10 minutes before scraping the edges with one of my icing spatula and turned it over onto a wire rack to cool.


Now I'm checking the proportions of the boobs next to the belly.


Now to ice it. I had to do each piece individually.


Okay so now if about the time that I admit it's 4pm and I've got ADD. I finished the mini princess cakes first, picked up my daughter from school and have been putting off using the fondant, because I've never used it by myself. The last time I did it, my best friend took it over and finished it. She's awesome like that. I love her :)

My husband actually had to roll out the last bit for me because he's buff like that ;)


then I rolled it back onto my rolling pin and placed it onto the cake.


I smoothed it out and cut away the extra and made a dress out of the fondant that was on the board


then dyed the fondant pink, re-rolled it out and started using my cookie cutters


I used water to stick on the fondant flowers.


I added a bow and sleeves just by rolling the fondant and making strips
 

***If you found this funny or helpful, please follow me. It gets a little lonely over here thinking that I'm talking to myself.I mean 850+ looks at this page and only 3 followers?**