Thursday, May 31, 2012

Graduation Caps

http://pinterest.com/search/?q=Graduation+cap
http://www.ehow.com/how_4898131_make-graduation-caps-out-paper.html


It's the end of the year. After two years of speech therapy, OT and early intervention, Hailey is graduating to Kindergarten in the fall. I am going to miss this class so much, they are so wonderful and have helped Hailey immensely.  Since this is her last year and a couple of other kids we decided we were having a graduation party. I needed these ready first so that I could make all the other treats later in the week. Excuse the different colors- I'm making 6 all together.

What you'll need:
Construction paper
yarn or ribbon
lightweight cardboard (like a cereal box)
glue
tape

First thing I had to do was measure two pieces of construction paper to make 21 inches. You'll have to glue them together to get the right length. I also added a bit of packaging tape to make sure it's secure. When they were dry I folded it in half horizontally and cut them- this makes TWO for around the head. On "raw side" Clip 1-inch slits around the top of the tube and bend them inward to create tabs, measure around your childs head and tape together.

I used a cereal box (again you get two if you use both sides) to get the top of the cap to be sturdy. I didn't have construction paper right right size ( 10x10) and so yet again I was gluing two pieces together and then wrapping it around the piece of cardboard.

When everything is dry,  glue the  bottom tot he top, and tape the folds down to keep it secure. I weighed ours down to make sure the glue stuck.

  •  
    "Make a tassel for the cap by winding yarn four times lengthwise around a ruler to create 12-inch loops. Cut a 24-inch piece of yarn and tie it through the top loops of the tassel to secure. Slip the loops off the ruler. Clip open the bottom loops. Glue the tassel to the center of the cap."


  • ***If you found this helpful, funny or anything else. Please follow me! I get kinda lonely :( ****

    Wednesday, May 30, 2012

    M & M Gift/Teacher gift

    http://themagicofordinarythings.blogspot.com/
    http://pinterest.com/pin/195765915022738704/


    The last day of speech therapy is tomorrow, I can't believe that two years and over 300 new words, Hailey will be a kindergartener the end of the summer!! We had to get our small gift bags ready. I didn't have mason jars and well, I had to make eight total this year for the teachers. I did however have the Avery printable bag toppers with bags from when I was going to sell things on eBay.

    I wrote the little poem (one part on each side) and printed them out. Then distributed a 54oz bag of
    M & M's between 8 bags. Then I sealed the bags, and added the labels.

     "Green is for the inspiration you give each day
    Blue is for the patience to show me the way
    Orange is for your warm and caring style
    Yellow is for the way you make me smile
    Red is for my life that you have touched this year.
    You're a very special teacher and like this bag (or jar) that's clear"

    On the other side:
    You're a "Magnificent" and "Marvelous" teacher
    Thanks for being my "M & M"
    Love, (or from)


    Then they each go into a bag, with the card we printed and the cross stitch we made


    http://pintrestchallenge.blogspot.com/2012/05/teacher-gift-bag.html

    ***If you found this helpful, funny or anything else. Please follow me! I get kinda lonely :( ****

    Tuesday, May 29, 2012

    Starbuck's inspired coffee cake

    http://pinterest.com/pin/195765915022385571/
    picky-palate.com

    (half recipe)

    1 Box Yellow Cake Mix (plus ingredients on back of box)


    Topping:
    2 Sticks cold salted butter
    2 1/4 Cups flour
    1 1/2 Tablespoons cinnamon
    1 ¾ Cups brown sugar
    1 1/2 Tablespoons vanilla
    Powdered sugar (for dusting)

    PREHEAT oven to 350.

    Mix together the cake mix  and place in a grease 9x13 pan. Cook for 15-20 minutes until just about done. (at 15 minutes mine was still shaky raw in the middle, so the full 20 it was).

     Yes, I wrote "Hi" in my batter- it was 6am and it made me laugh.

    When you have about 10 minutes left in baking the cake, it's a good idea to make the crumb topping.


    When the cake is done, immediately crumble topping onto it and let cool.


    Verdict: I admit I was hesitant about making this. I was like, "It's going to taste like a cake" but alas I really needed to use my eggs before they expired. It really is good and taste authentic. The last time I made from scratch  coffee cake it was too dry, this was not!

    Monday, May 28, 2012

    Pizza box soccer game

    http://pinterest.com/pin/195765915022664079/
    craftymamablog.com

    After having dinner last night (Costco pizza- score!) We decided to spend our Memorial day playing straw soccer. Since the Costco pizza box was big and we only had 3 piece of green paper we cut our box in half. Then glued  them down. THAT'S when I realized I probably should have cut the goal spots out first because it tore the paper up when we cut it out.  Using white paint (or what we had) we made the middle line and the circle for the face off (excuse my lack of technical terms). We added cut straws that for the goal post and cereal and hot chocolate lids for the advertising that you see on the field, which I thought was an extremely cleaver idea! Got out a pom pom and two more straws and let the girls play.


    About five minutes after tat photo the girls quit and are saying they are bored :( It was a cool idea and would be fun for anyone, just apparently not my two.

    Sunday, May 27, 2012

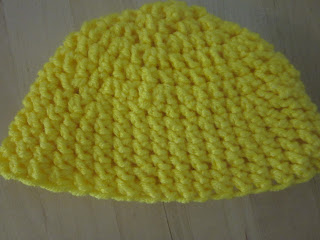
    Crochet Baby Hat

      This was a two day pin- it was that long, just getting answers was the hard part.


    Pintrest Objective: http://pinterest.com/pin/195765915022330802/

    So I've been trying to learn to crochet. My mom taught me the "chain stitch" and another stitch and she doesn't know the name. And let me tell you, I can make one hell of a chain stitch. But I always get lost after the first row I make going the opposite direction. For some reason I decided learning a hat would be easier... I have watched this video about 20 times and she goes EXTREMELY fast for beginners like myself. I did have to check out a book from the library just to figure out half the stitches in slow motion.
    This other pin: http://pinterest.com/pin/195765915021968029/ became very helpful.

    Also try http://www.dummies.com/how-to/crafts-hobbies/Crocheting.html

    I started my knot by making the loop and pulling the hook through. Holding the string I chained 5

    and connected them by putting the hook back through the very first chain we made, looping the yarn and pulling it through.

    This is where I'd get confused. What you do for the ring part now is put the hook through the middle of the circle, pull the yarn through so you have two strands on your hook and do a single stitch, repeat 8 times. Now you should have something that looks like this:

    No you're going to put TWO single crochets into each chain that you have. Confused? Oh good, me too. I think that when I learned crochet lingo I lost some vital information about other things...but I can't quite put my finger on what...


    Just keep going until you decided to be finished. To make it curve in (thanks video lady for saying "just finish it like you always do!" even though this is for BEGINNERS!)  I had to ask a couple of people and google it to find out you skip one chain every so often to make it start curving in.

    Saturday, May 26, 2012

    Popcorn from paper bag

    http://www.squawkfox.com/2010/07/27/popcorn-recipe-gourmet-popcorn/
    http://pinterest.com/pin/184366178465815814/


    This afternoon was "movie day" and  we needed some popcorn. I used my last store bought microwave popcorn the other day. Now, I could pull out the popcorn maker my husband thought we needed, but last time we used it he over flowed it and I thought we were going to have a whole room full of popcorn. I remember a couple years back I asked "Why can't we just pop the kernals in a brown bag?" my mom told me some crazy reason and, well...I believed her. Then I saw this pin and had to try it.

    Using a plain brown paper bag and a half cup of kernals I put them into the microwave for about 2 minutes and kept a watchful eye on them.

    When it was done pop-pop-poppin' I poured it into two small mixing bowls and sprinkled some salt.
    Verdict: Good! and healthy!

    Friday, May 25, 2012

    Fruit Kabobs

    http://pinterest.com/pin/195765915022709975/edit/
    http://undressedskeleton.tumblr.com/DoingDessert

    Super easy. Since we had an abundance of fruit yet again. We made it into a dessert.  We took our clean kabob sticks that we purchased a while back and saved in a zip loc, cleaned the fruit and began stringing it onto the sticks. When the girls had put at least half the stick length of fruit I gave them a couple of marshmallows- to which I was told I was "really cool" for. Score one for me.

    Anyway then we melted some kisses in a zip loc bag, snipped the tip and drizzled chocolate all over the fruit.


    The girls enjoyed their different "dessert" and got extremely messy from it. How I don't think I'll ever know.

    Thursday, May 24, 2012

    The boredom busting jar

    http://pinterest.com/pin/195765915022717829/

    shabbybeachnest.com


    The two words I think most moms cringe at hearing are "I'm bored!" or "There's nothing to do!" Quite frankly I feel like there is a lot to do, but my six year old digresses. I saw this on pintrest this morning and said, "Yep. I'm gonna make that!"

    This morning over breakfast the girls and I talked about fun things that they liked doing. We made a list and with some fun ones from the website we wrote on (with a pen, not a sharpie, they bleed) the popsicle sticks. I was going to print them, but the words would have been small and I'm running out of ink.  Our popsicles include activities like:

    Take a walk, go on the patio, color a picture, play with toys, play a board game, write a story, clean your room, do a paper craft, bake something, watch a movie, etc...

    We took an empty and clean soup can and covered it with the label "The Bored Jar"  and Hannah drew a duck on it.

    Wednesday, May 23, 2012

    Movie Gift Basket

    http://pinterest.com/pin/195765915022677031/
    tipjunkie.com

    It's almost he end of the year, I can't believe school is almost out. With parent donations I put together another small gift basket for our teacher to tell her thanks for everything she does. I chose a dinner and a movie theme. I know how much time teachers spend in the classroom away from their own families to take care of our children, and I thought this would be a nice gesture to her.

    So I was going to make a popcorn box for the teacher, but I had no card stock. Buying it just for one sheet would have been expensive. So I found a popcorn container in the dollar section at Target and we were good to go. First I had to find out her favorite restaurant. Luckily my anniversary is coming up and I used it as an excuse to ask where she and her family like to go.  I zipped over there while out on errands and picked up a movie gift card also. At Wal*Mart they have the 98cent boxed candies (the kind you see at the theater) so I picked up two. With some tape I put them together so they would quit falling inside.

    ***If you found this helpful, funny or anything else. Please follow me! I get kinda lonely :( ****

    Tuesday, May 22, 2012

    Bread bowls

     http://pinterest.com/pin/195765915022302606/
     http://www.whatmegansmaking.com/2011/04/french-bread-rolls.html

    Ingredients:
    1 1/2 cups warm water
    3/4 Tbsp instant yeast (or 1 Tbsp active dry yeast)
    2 Tbsp granulated sugar (I've noticed that every time I use sugar, my bread has a funky taste. I like honey instead)
    2 Tbsp canola oil
    1 teaspoon salt
    4 cups all-purpose flour, give or take a few tablespoons

    Directions:
    Add yeast to warm water, set aside for 5 minutes or until it activates (it'll look foamy). Mix sugar, flour, salt and oil in mixer. When yeast is foamy, add it to the dry ingredients until fully mixed. You may need to knead by hand a little bit to form it into a round. Place in greased bowl and let rise for 1 hour or doubled in size.

    When it's risen, punch down and divided into smaller balls (this one says it makes 6, I cut mine in half and only made 2) add the slashes on top to let the air escape when you bake. let rise again until doubled in size.


    Bake at 400 degrees for minutes or until golden.


     We filled ours with spaghetti


    We also made a sour dough round with my sour dough starter
    http://pinterest.com/pin/195765915022653646/
    http://rockrecipes.blogspot.com/2008/01/easy-sourdough-bread.html

    Sourdough Bread

    3- 3 ½ cups all purpose flour
    4 tbsp sugar1 tbsp salt1 tsp instant yeast
    1 ½ cups sourdough starter
    ½ cup warm milk 3 tbsp olive oil

    I started mine yesterday and let it rise over night. Then shaped it, slashed the tops and had it rise in the oven for 1 hour.  Then I brushed the top with some egg white and water. baked it with the French bread bowl.

     Verdicts: I was amazed that the sour dough rose better than the French bread. They both taste great and we're not very full.

    Monday, May 21, 2012

    DIY Stress Ball

    http://pinterest.com/pin/202802789439525764/
    http://vikinginoz.blogspot.com/2008/11/making-of-funky-ball.html


    Fill a balloon up with 1/4 cup of rice or sand. We tried to get ours big like the pictures- it wasn't working. We also don't own a funnel... I think after we filled it we needed to use it. This works great as a stress ball- we were going to give it to my husband as a joke, but Hailey decided it was a pinata....

    Sunday, May 20, 2012

    Pinata

    http://pinterest.com/pin/195765915022596757/
    craftingagreenworld.com


     Okay what better way to spend two weekends than making your very own pinata?? Here is what we did.

    Blow up a balloon to the shape and size you want.  We as always chose Mickey Mouse. Cut/tear strips of newspaper.

    Mix together 1 part flour to 2 parts water. You will want it to be the consistency of thick glue, but you also want it to be runny and not thick like paste. Add more water or flour as necessary. Mix well to remove any lumps.


     Dip the ripped newspaper into mixture and wrap around the balloon. You're going to want several layers (as we learned later my husbands 20 for Mickey Mouse was too many). When you're done wait for it to dry. Ours took about a day and a half, but with school and work we had to wait until this weekend to finish.

    May 20th
    This morning I sketched out Mickey Mouse's face and then spray painted the parts I needed to black. With peach acrylic paint we painted his face and let him dry--2 1/2 hours. When we came back from Sunday shopping I added his eyes, nose and mouth. Let him set while we ate lunch.


    Then we cut a hole in his head and added some candy, because what is a pinata without it?? Attaching the string was hard. We actually had to put a hole in the front and one diagonally in the back of Mickey's head to get him to hang.

    Then the girls took a whack at him. It was a sweet victory! and a lot of time I kinda wasted trying to make him look juuust right, lol.

    Friday, May 18, 2012

    Emotion Chart

    http://pinterest.com/pin/195765915022683866/
    Therapist Resources <3


    In order to help the girls express their feelings a little better, I've printed off the cute emotion chart and fake laminated it (I used packaging tape) This way when they are feeling a specific way they can circle the emotion with a dry erase marker and either be left alone for a while or talk about why they feel that way.

    Thursday, May 17, 2012

    Sour Dough Starter


    http://whatscookingamerica.net/Bread/SourdoughStarter.htm
    Please go to the original source- she wrote it very detailed and it was a great help!
    *Do NOT use a bowl like I did. Use a spaghetti jar.That one worked better!*

    Ingredients:
    2 cups all-purpose flour*
    2 teaspoons granulated sugar (optional)**
    1 packet (2 1/4 teaspoons) of active-dry yeast
    2 cups warm water (105 to 115 degrees F.)

    Right after I mixed it all together:

    Several hours later:


    24 hours later:
    mine had developed a crust- 

     I took the weird crust off, and stirred it...


    I goodle-ed "crust on sour dough starter" and it claims it's normal...Just in case I started  an extra one using a spaghetti jar this time with a damp paper towel covering the top. How I'll get it out later it beyond me- I'll think about it for the next couple of days. lol


    A couple hours later
    Day 2
    As quoted by original poster " Let it sit out (at room temperature) for 2 to 5 days, stirring it once a day. The starter is ready when it develops a pleasant sour smell and looks bubbly.
    Once your starter starts bubbling, then start feeding it daily with flour and water according to the directions below. Then stir it, cover loosely with plastic wrap (allow a little breathing space), and store it on your counter top or in the refrigerator (your choice)."


    Yeah, the one I had in the bowl crusted again and looked gross- I tossed it.

     However, my one in the spaghetti jar looked promising.  I stirred it and placed my damp paper towel back over the lid
    Day 3
    I poured in a little warm water and some flour- I have to eye this all since I didn't do the original posters amount. placed warm and damp paper towel over lid
    Day 4: Again, added some more flour and warm water and wet paper towel over the lid--it's starting to smell like sour dough


    Day 5: Yep, you guessed it :  added some more flour and warm water and wet paper towel over the lid-Much more sour dough scent- by tomorrow it should be ready!
    Day 6: Just keep feeding- just keep feeding. I was going to make the bread today, but I ran out of time.


    Day 7: Today was the day! We are making:
    Sour Dough Bread
    http://pinterest.com/pin/195765915022675764/
    http://www.food.com/recipe/sourdough-bread-and-starter-78816

    Directions:

    Add  flour, salt, sugar, butter and water in mixer, mix for about a minute and then add your starter. I had to add a TINY bit extra just to make sure it formed. Then let it rise until doubled in size- mine took about 2 hours.

      then I rolled it out and formed the dough by "jelly rolling" the dough and placings it in the pan, 

    I let mine rise again because it looked kinda odd.
    I baked the bread at 350 for 35 minutes.

    Verdict: Maybe it's my sinus' but I don't taste the sour dough. The kids all did though.


    Read more: http://www.food.com/recipe/sourdough-bread-and-starter-78816#ixzz1v9JFry6y