http://pinterest.com/pin/195765915023286130
http://classroomcollective.tumblr.com/post/16986789221/weather-fill-the-cup-with-water-put-shaving
Alright it has begun to rain here in California. Nothing crazy- but it's finally feeling a little like Fall. To explain to Hailey how the rain for lack of better term works I showed her this pin. We took a clear cup of water and filled the top with white shaving cream.
Then I took blue food coloring and began to drop the food coloring onto the clouds. I explained how the clouds fill up with moisture in the air and eventually the cloud becomes so full that it has to rain
(and then the food coloring began falling out!).
Starting February 25th 2012, My family and I are going to see how many "pins" from Pintrest.com we can do in a year.
Tuesday, October 23, 2012
Monday, October 22, 2012
Learning to tie shoes
Part of Kindergarten homework is a month worth of activies that the stuedent does and checks off. This is the 3rd time "tie your shoes" has shown up and the first time I've attempted to teach my youngest how. Through the help of two pintrest pins we're on our way.
first I took an empty cereal box, cut it open and folded the longest piece in half. I taped it down and traced a shoe onto the board. Then I kind of drew a "shoe" onto it. After that we added holes with a pair of scissors and laced the shoe up. After that we took a black sharpie and colored half the laces (this way the kids get the idea of which string it which side)
http://pinterest.com/pin/195765915023699000/
Once our little cardboard shoe was made, we watched the video- 3 different techniques on how to tie shoes.
http://www.onecraftyplace.com/2012/10/16/teach-your-child-to-tie-shoelaces/?utm_source=feedburner&utm_medium=email&utm_campaign=Feed%3A+OneCraftyPlace+%28One+Crafty+Place%29
Out of all of them the bunny ears was the easiest for her!
Sunday, October 21, 2012
Pumpkin and Mask Decorating
http://pinterest.com/pin/195765915023632362/
http://nurturestore.co.uk/pumpkin-decorating-with-children-ideas
So like I've mentioned earlier we grew enough pumpkins in our garden to accommodate all the girls that were invited to the party. To make it fair we numbered each pumpkin and numbered pieces of papers in a bowl. The girls had to chose from the bucket and that determined their pumpkin.
Once everyone had a pumpkin they went back to the table where they added feathers, google eyes, glittler, marker, pom poms, pipe cleaners, or their Halloween masks. I was amazed at how long the kids took the decorate, but used hardly any of the stuff. Make sure the tables are covered with newspaper or something that you do not mind
The girls being silly
MASKS
http://pinterest.com/pin/195765915023524584
http://www.firstpalette.com/tool_box/printables/masquerademask.html
All we dud was print the masks and have the girls decorate them however they wanted.
Decorate a pumpkin and mask
Monster Door
Photo Booth Props
Games and Crafts
Erupting Pumpkin
Monster Door
Photo Booth Props
Games and Crafts
Halloween Party food
Our party was a pot luck Halloween inspired party. It was a lot of fun and I admit less stressful! Okay, only slightly less stressful because I was so busy all week that I was still getting things ready when the kids started coming. Anyway, here are the things I made from pintrest along with the suggestions from pintrest others brought.
I don't have an extensive amount of space in my apartment, so I took my kitchen island (it's always against the wall and next to a counter) and covered both of them with a tablecloth.
COOKIE
http://pinterest.com/pin/195765915023687366/
http://www.mrsfields.com/gifts/Jack-O-Lantern
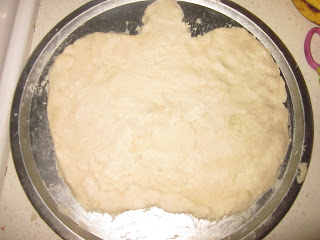
My husband almost bought this cookie for our Halloween party when he saw it online. Quite frankly I'm not a fan of Mrs. Fields online cookies. The one time we got them for Easter they were crumbling in your mouth (in a bad way) and just did not taste right. If I'm going to eat Mrs. Fields it must be fresh. I also knew that it was fairly easy to replicate this. I started by greasing a pizza pan. Then I cut open the package of Pillsburry sugar cookie mix (I had to change the cookie flavor because a girl at the party is allergic to dairy). I used a greased rolling pin to flatten most of the dough, then used my hands to shape it into a pumpkin. I did not take it all the way to the end because it WILL expand.
I baked it at a lower temperature (325) for about 15 minutes. It came out a nice golden brown. When it cooled I iced the cookie. I did not have any green icing, but I did have green food spray. I added orange colored sprinkles to the rim.
CAKE
http://pinterest.com/pin/195765915023287193/
http://www.bettycrocker.com/recipes/pull-apart-spiderweb-cupcakes/325ad00b-96d4-4e9b-8750-d219bbe53ce6?nicam4=SocialMedia&nichn4=Pinterest&niseg4=BettyCrocker&nicreatID4=Post
I started the cupcake cake by baking 14 vegan chocolate cupcakes. While they were cooling I took a cookie sheet and covered it in paper to make it look nice. When they were cooled I arranged the cupcakes on the tray (they kind of looked like a snow flake). I took the orange icing and smoothed it all over the top. Now this is where I strayed from the original. I took a Betty Crocker pre-made icing tube in black and made the web. They made black rings and ran a tooth pick through it.
http://pinterest.com/pin/195765915022735506/
http://www.aturtleslifeforme.com/search?updated-max=2011-11-02T21%253A10%253A00-04%253A00&max-results=7
I'm now reminding people who don't visit often of two things: I don't always get the pins right because I don't have these objects on hand and 2) I do them from memory sometimes. So, I made the green vanilla pudding yesterday morning. I set it into the green cups I had (it would have looked cooler if I had had clear) and after they set awhile added chocolate sprinkles to the top. Here is my mistake: I forgot to add faces to the cups BEFORE putting the pudding in so when I went to draw on them with sharpie everything was smearing because of the condensation.
WITCHES BREW:
http://pinterest.com/pin/195765915023710442/
I only got the idea from pintrest, I then saw that Target sold both the cauldron and two punch mixes for $8. All I had to do was add soda. Which fizzed all over the place when I mixed it (the girls thought that was hilarious) . Two days before I made the ice hands by freezing water in a glove. First, the glove didn't want to come off when I was ready to use it, then it didn't want to fit in the cauldron and I had to break the fingers. It fit after that.
Other pintrest inspired foods at the party that we brought:
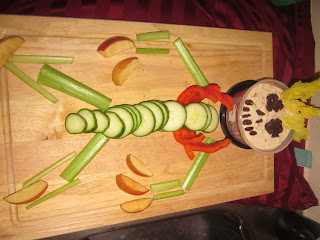
The Veggie Skeleton Man
Mummy Dogs
Another angle of the food (you can almost see the witch wands, but not really.
Other foods we had: Orange and black tortilla chips, cupcake flavored goldfish, grapes, bananas, oranges, and Halloween Rice krispies:
Here is what else we did at the party if you're curious:
Decorate a pumpkin and mask
Monster Door
Photo Booth Props
Games and Crafts
Erupting Pumpkin
Erupting pumpkin
http://www.growingajeweledrose.com/2012/09/erupting-pumpkins-experiment-for-kids.html
http://pinterest.com/pin/195765915023695146/
We are very into science in our house. So it only felt fitting to have at least one science experiment at the Halloween party. We had seen an erupting volcano before, but a pumpkin? Oh this we had to do. Luckily we had grown well over enough pumpkins in our garden to accommodate all the girls at the party as well as the erupting pumpkin. Before the party I cut, scooped and carved it. While the girls' (all nine of them) gathered in the entry way of my kitchen I sprinkled a bunch of baking soda at the base of the pumpkin. Next we chose some green food coloring to add a little color- who wants white?
Then I added the vinegar and it began to foam. I really wish I had been able to get it on tape because the girls' were all amazed and it really was cool to watch it foam and go everywhere.
Decorate a pumpkin and mask
Monster Door
Photo Booth Props
Games and Crafts
Friday, October 19, 2012
Monster door
http://pinterest.com/pin/195765915022732346
http://blog.passion-for-parties.com/search?updated-max=2011-11-29T21:14:00-05:00&max-results=7
This one is pretty easy. the girls and I decided our door needed to be a little more spooky. So we took some white circles (can use white paper plates), smaller black circles for the eyes, a long black strip and three smaller strips vertically to make a kind of stitched look. Then we made the monsters hair by cutting...triangle shapes out of the paper. We glued the pupils to the eyeballs, and taped everything down to the door.
Thursday, October 18, 2012
Scooby Doo photo props
http://www.etsy.com/listing/96092375/photobooth-prop-scooby-doo-and-friends?utm_source=Pinterest&utm_medium=PageTools&utm_campaign=Share
http://pinterest.com/pin/195765915023639140
Alright so Hannah is really into Scooby-Doo! right now and I thought for her birthday we would make a photo booth so that I get all the kids pictures. I happened to be searching other props when I found the Scooby-Doo one and just had to make it. Since it's on Etsy, I decided I'd make my own instead. They are actually easier to make than you think.
The first thing I did was find coloring pages of each character, then put it into paint workshop. I cropped out all the things I didn't want (i.e. faces, eyes, bodies) and kept only what I did. When I was satisfied with how they looked, I made sure my print preview that the image was the whole page. I printed it off, cut it out and traced it onto a piece of cardboard (I've been using hot cocoa and cereal boxes).
Once it is on cardboard I pinned it to the color of felt that I needed and cut that out. I turned on my hot glue gun and let that warm up while I snipped the sharp parts of the kabob sticks off. When the glue gun was ready I glued it all down. Half way through my printer died and I had to sketch Daphne's by hand using the size of Velma's as a template. Then it worked for Fred's ascot, then had to fake Scooby's collar and Shaggy's goatee.
The results are great. Are they are precise as the person on etsy? probably not (but at least Fred's ascot is the right color). It was also a heck of a lot cheaper!
Wednesday, October 17, 2012
Photo Booth Props
To make the actual "booth" I took an orange table cloth and tacked it up against my door. It looks much better when you're not doing a group shot (scroll down to see what I mean)
http://pinterest.com/pin/195765915023639119
http://ruffledblog.com/diy-white-striped-mustache-on-a-stick-photobooth-props/
So for our Halloween party I decided to have a little fun and make a photo booth area. I keep seeing the mustaches, etc.. and decided to give it a try. While I was at Target I happened to find a 4 pack of mustaches for $1 and thought they would go great for our booth. If you can't find it the easiest way to do it is: print the picture you want, transfer it onto cardboard, cut it out on felt.
Once it is on cardboard I pinned it to the color of felt that I needed and cut that out. I turned on my hot glue gun and let that warm up while I snipped the sharp parts of the kabob sticks off. For some added fanciness try wrapping the stick with ribbons. When the glue gun was ready I glued it all down.
We also made some lips from this pin
http://pinterest.com/pin/195765915023639134/
http://littlerayovsun.wordpress.com/tag/diy-photobooth-props/
Then we added Halloween inspired:
http://pinterest.com/pin/321233385890524467
http://www.etsy.com/listing/86740670/photo-booth-props-twilight-breaking-dawn
all you have to do is make the lips, cut out the middles and add white triangle pieces for the fangs. Super easy!
Tuesday, October 16, 2012
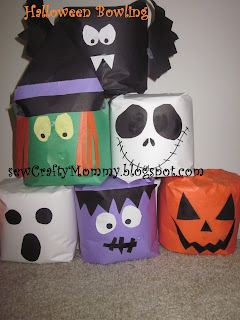
Halloween Bowling
http://pinterest.com/pin/195765915023524702
http://www.jeanetics.net/2010/10/fall-party.html
I am getting ready for not only our Halloween party (the first one we've ever thrown!) and the schools Halloween party. We needed games and I saw this pin and likes it- sort of. I decided to alter it a little bit to more of my liking.
I took the toilet paper rolls and wrapped them in colored parchment type paper, tapped them and folded the tops and bottoms down like I was wrapping a present. Make sure they are flat because you'll need to stack them.
Then added the faces I used Sharpie for the eyes:
A Bat ( Black paper, white eyes and
pointed teeth)
a ghost (white paper black circular eyes and an oval mouth
Jack Skellington (white paper, black eyes and nose, mouth drawn on with sharpie,
purple monsters (purple paper, white eyes, jagged hair and "stitched mouth")
and a jack
o'lantern. We also are using a Styrofoam pumpkin instead of real because
seven and eight year old boys are not exactly easy on things.
Thursday, October 11, 2012
Pore strip
http://pinterest.com/pin/195765915022719034/
http://petitelefant.com/how-to-pore-strips/
I was out of the Biore pore strips for blackhead removal and I figured why not try this pin today.
Ingredients:
1 Tablespoon Unflavored Gelatin
1 1/2- 2 Tablespoons Milk
Directions:
Add 1-2 Tablespoons of milk into the gelatin. Then mix it up, and be quick about it, until you get a chunky consistency. Add more milk if you don't like the clumpiness. Apply to face.
That is as far as I got because it smelled like vomit (and looked like it) & felt incredibly disgusting on that after two minutes I had to wash it off.
Wednesday, October 10, 2012
Ruffle skirt for American Girl
http://pinterest.com/pin/195765915023634600/
http://quelinda-crafts.blogspot.com/search/label/tutorial?updated-max=2011-10-03T13:22:00-07:00&max-results=20&start=24&by-date=false
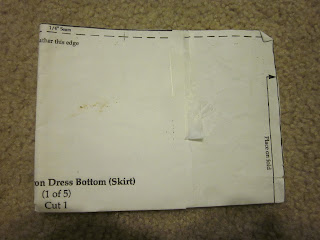
Alright the original pin I was going to use was spam, so I had to find a regular one and just down size. I used Kirsten's skirt pattern (found here for free) I shortened it and cut semi it in half. It looked like this when I was done:
If sort of resembled a mini skirt.
So I pinned that to black fabric,cut it out, hemmed and sewed the bottom, and made a BIG this was my base. Next I chose the Halloween fabric I was going to use for Hailey's. Let me tell you, originally I was going to make the likes vertical in long strips. Then I didn't like it and so I changed it to what I'm doing now. I cut them into patches and sewed them back together. The ruffles strips must be the length of the base skirt and a half. Next hem each strip of fabric and sew it up.
After that you gather the fabric and pin it to the black base. The top layer must be sewn right side to right side and flipped down. It will not stay down until the skirt is sewn together.
The next row can be sewn just under the first ruffle and so forth until you're done with your ruffles. You can add as many ruffles as you like.
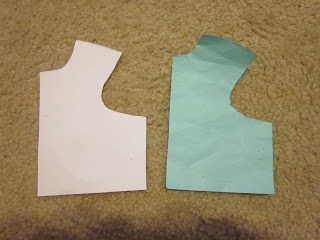
The tops were kinda thrown together. Using the Kirsten Birthday shirt pattern I added length and width and the shapes- they look like this The white one is the front cut onto a fold:
My youngest is going through a "tie top tank top" and my oldest liked the halter top look. The curved one is also cut on a fold
.
After the fact my youngest wanted her shirt changed.
My other American Girl items:
No sew tutu
Witch Costume
school supplies
feel better kit (Just like McKenna's!)
Gymnastics accessories
head band
Minnie Mouse ears
sleeping bags
sleeping mask
pillow dress
accessories
pet accessories
**If you found this funny, useful or both, please follow me. I get a little lonely! Thanks :)
Tuesday, October 9, 2012
Magnet Spiders (Halloween decoration)
It is extremely easy. While my oldest was at a birthday party, my youngest and I decided the house was not spooky enough and so we got out more decorations. That's when I remembered the spider magnet. We took some plastic spiders from all around the house and a pre-adhesive magnet and stuck it to the spider. That's it. Then we stuck them to our front door (inside only)
The other thing we did was the mini orange jack o'lanterns
http://pinterest.com/pin/195765915023187839
http://underconstructionblog.typepad.com/under_construction/2010/10/halloween-fruit.html
We bought the mini oranges and with a black sharpie drew faces onto them. They've made for a great lunchbox treat at school and well a few of them are decoration until they are eaten,
Subscribe to:
Comments (Atom)


